My full strength henna treatment
I just want to emphasise that before putting henna on the whole head of hair, TEST THE HAIR FIRST! Take shed hair strands from a hair comb, and place the hair in some henna. Check after a few hours, then after a day on the condition of the hair. If it is favourable, go ahead…
This might seem like a really long and complicated process at first, but after the first few times, it becomes easier and simpler. Basically I prepare my mixture and detangle and moisturise my hair a day before. Then the next day at night, I apply the henna on to my hair, go to sleep then wake up in the morning and wash it out.
Ingredients for my henna mix for my medium density neck length hair
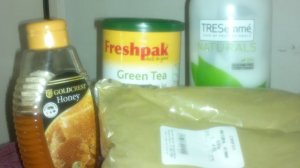
Ingredients
100g of pure good quality henna ( for thicker and longer hair, more should be used) – Body Art Quality (BAQ) is recommended
3 teabags of green tea (any other acidic liquid can be used, such as lemon juice, apple cider vinegar, orange juice, black tea, etc I use green tea because it is the least harsh)
2 tablespoons of pure honey
2 cups of water
Products used after henna application
Organic Root Stimulator replenishing conditioner (or deep moisturising conditioner of your choice)
Leave – in conditioner
Olive/Castor oil (or any other oil or cream of your choice)
Recommended materials
All these materials will most likely get stained, so it’s best to use things you don’t really need for anything else.

Materials and after henna products
Gloves
Old newspapers or towels
Glass bowl or tupperware container (I use a lunchbox container)
Spoon to mix
Shower cap and/or plastic bag
Head scarf
Optional: micro heat cap or hooded dryer Mixing it up ( about 1 hour to prepare)
Preparation (about 1 hour to prepare and 12 hours to allow for dye release)

Henna mix
1. Bring the two cups of water to the boil
2. Add the green tea to the water and let it cool
3. Put the henna powder in the bowl/container and slowly add the tea mixture to the powder until it is the consistency of mashed potatoes
4. Cover it with a lid or foil paper, and let it sit for about 12 hours, so the dye releases
5. About 30mins before putting it on the hair, add the honey and mix it. The mixture should have smooth consistency but not runny
Applying it to the hair (30 minutes)
1. Make sure hair is detangled, hair can be damp or dry (I do it on dry hair)
2. Part workable hair sections with clips or by sectioning then making twists
3. With the bathroom floor covered in newspapers or used towels, and gloves on, choose a section to work with ( I start from the back)
4. Using the gloves, plaster the henna mixture on the section in a plopping motion, not rubbing it in. Be generous, and try to make sure all the hair has henna on it
5. Repeat with all the sections
6. When the whole head of hair is covered in henna, put on the plastic bag or shower cap (I use two), then put on a scarf over it.
After henna application (4- 8 hours to allow henna to marinate, then about an hour to wash out)

Plastic and scarf for the night
1. To allow your hair to let the henna penetrate, wait about 6-8 hours before washing it out. I simply I go to sleep with it, then wake up and wash it out. Alternatively, to shorten the time for soaking up, a heat source such as a heat cap or hooded dryer can be used and the henna can be washed out after 4 hours.
2. After this, the henna can be washed out. This can be done by dunking the head in the bathtub or large dish of water (remember henna stains though) to get most of the henna out. Then to ensure all of it is out, you can run water over your hair in the shower. A slippery conditioner can be used to wash out the henna. It will basically feel like you are washing out dried mud from your hair (my least favourite part about using henna)
3. When the hair is free of henna, apply the moisturising deep treatment and let it sit for at least 30 minutes
4. Wash it out, dry and style as usual

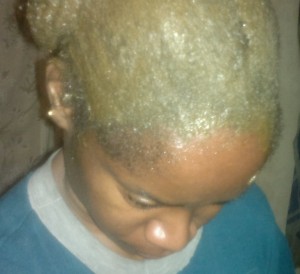
Just after washing out the henna
.
- My Henna Story: Part 1 (tafistresses.wordpress.com)


Recent Comments